
Instructions and Guides
The following instructions and guides will help you learn to use and manage various technology platforms available through IT.
- Connecting from Off-Campus
- Data Management
- Phone Etiquette
- Windows Guide and Tips
- Technology Handbook
Using FTP
FTP Instructions
To upload content to your personal web space, you will need your APU NetID, your password, and FTP software, such as Filezilla. The below instructions are for those using Filezilla for Microsoft Windows or Filezilla for the Mac. University machines will have Filezilla installed, but if you do not have the application, visit the FileZilla website to download a free copy.
Files that you want to access from a web browser must be placed in the public_html folder. Otherwise, they will not be accessible from the web.
SSH Instructions
Faculty and staff members who wish to use SSH on personal webpages must request access through the IT Support Center. To request access, email [email protected] with your name, APU NetID, and the reason SSH access is desired (note: Telnet access is no longer available).
Distribution of Data
IT is not authorized to release personal data. Requests for personal information should go through the appropriate office:
| Type of Data | Department |
|---|---|
| Current Students | Student Services Center |
| Prospective Students | Office of Undergraduate Admissions |
| Alumni | Office of Alumni Engagement |
| Faculty | Office of the Provost |
| Staff | Office of Human Resources |
Privacy/FERPA
A student’s educational record is protected by FERPA, the Family Educational Rights and Privacy Act. With the exception of “directory information,” student records are not to be released to a third party (including parent or spouse) without the express written permission of the student. Failure to comply with FERPA could result in the loss of all federal financial aid funds. Two types of records exist:
Directory Information
The following information is not included in FERPA and is available to the general APU community:
- Student’s name
- Maiden name
- Address
- Telephone number
- Date and place of birth
- Major field of study
- Courses taken
- Participation in officially recognized activities and sports
- Weight and height of members of athletic teams
- Dates of attendance
- Degrees and awards received
- All previous educational agencies or institutions attended
- Current class schedule
- Employer
- Church membership
- Photographs
- Parents’ names
- Parents’ addresses and telephone numbers
Assuring We Comply with FERPA
- Never give out grades over the telephone. Even if you think you recognize the voice of a familiar student, you must tell the individual this is against federal regulations.
- Never give out ANY negative information about a student. (Example: “Her degree is not posted because she has not completed all requirements.”)
- Never release information about a student’s finances to a third party. Questions regarding financial information should be forwarded to the appropriate Student Services Center office.
- You may release basic directory information at your discretion, however, when in doubt, always err on the side of maintaining a student’s privacy. Establish that the “requestor” has a legitimate business or professional reason for receiving the information.
- Refer requests for enrollment or degree verification to the appropriate Registrar’s office.
- Refer students who wish a copy of their grades to the appropriate Registrar’s office.
- Leaving graded student papers where others can have access (e.g. a box in the hall) or posting student grades with their names, social security numbers, APU ID numbers, or a random instructor-assigned numbers is a violation of FERPA.
- Every student has the right to ask that ALL information about them, including directory
information, be released only with their express written permission. When you encounter
the message, “DO NOT RELEASE INFO: FEDERAL PRIVACY CODE, APU STAFF ONLY” in APU Look,
it means that the student invoked this right. Each request to receive information
must be accompanied by written permission from the student. If we receive an inquiry
about a student with this hold, the university is not even permitted to confirm or
deny that the individual is a student.
- Incorrect response: “I cannot release information about that student.”
- Correct response: “I cannot release any information without the permission of the individual.”
- Particular care should be taken with ALL documents generated from our student information system, IFAS. All documents should be disposed of appropriately, namely shredding.
FERPA policies must be published in academic catalogs by law. For more information about other rights and requirements of FERPA, please contact the Registrar.
A Word about Student Workers
All student workers are required to sign the following when they are hired:
“As a student employee I understand that as part of my campus employment, I may have access to or become aware of confidential information that relates to students and their parents/guardians or members of the University community. As a condition of my student employment, a violation of which will be grounds for termination, I agree to keep in confidence any information that I may become aware of as a result of my student employment that should be kept in confidence. In any case where I am not sure whether the information is confidential, I will check with my supervisor before divulging the information to anyone.”
It is, of course, important if you supervise students to stress the importance of confidentiality. As a supervisor, you may decide to keep that procedure (accessing those with security hold) for staff members only.
If you have any questions not covered in this document, please contact the appropriate Registrar’s office.
Email Guidelines
Email Etiquette
We encourage email users to have a basic understanding of good email etiquette. The Email Etiquette (PDF)* guide will help users learn the foundations.
Policies
For a list of IT policies, including those related to email, visit the policies index.
Hoaxes
Forwarding email hoaxes is a violation of APU's Acceptable Use Policy. Check the validity of email warnings, petitions, and special interest alerts before forwarding them. Below is a list of virus and hoax resources for your benefit.
- Read the official IT list – A list of email hoaxes and viruses provided by IT for the benefit of the APU community in Outlook > All Public Folders > APU Public Folders > E-Mail Hoaxes
- Search by subject and find out if an email is legitimate or a hoax:
About.com Archive of Urban Legends and Folklore - Check the McAfee website for new legitimate virus warnings or to see if the one you just received is a hoax:
McAfee virus information
Setting Spam Rules
Please use the links below for instructions for your mail client to setup a spam rule for filing junk mail.
Microsoft Outlook Web Access (Webmail) Spam Rule
Please make sure to execute the following steps using Internet Explorer or a browser that uses Internet Explorer as a base browser (i.e. Avant Browser). Netscape, Mozilla, and Firefox will not work with these instructions.
- Logon to webmail (mail.apu.edu)
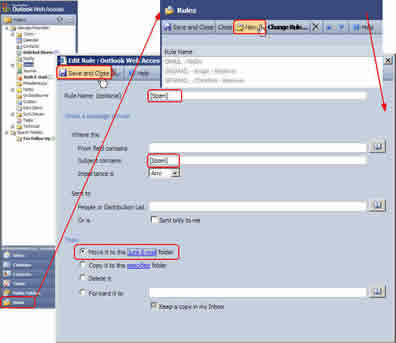
- Click on “Rules” (See illustration below.)
- Click “New...”
- Complete the next screen like the screenshot below:
Click image to view larger
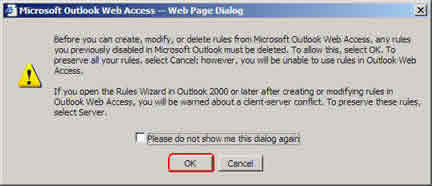
This will only delete any rules that are currently disabled for you, anything that is NOT disabled will reman in effect, so, in most cases it is safe to click “Ok” on this message.
5. After the rule is in place, the rules window will look something like this:
Click image to view larger
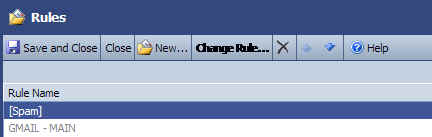
Now you can go back to your Inbox and perform other tasks. From this point on, all messages tagged as [Spam] will be filed in the folder your specified for Junk Mail.
Microsoft Entourage for Mac Spam Rule
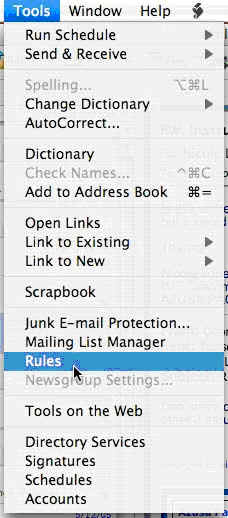
1. Click on the “Tools” menu.
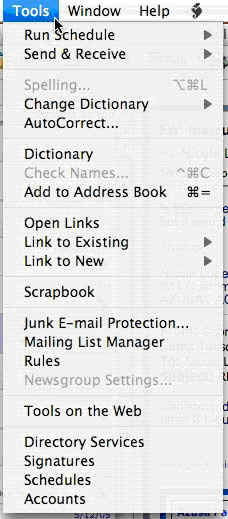
2. Click on "Rules."
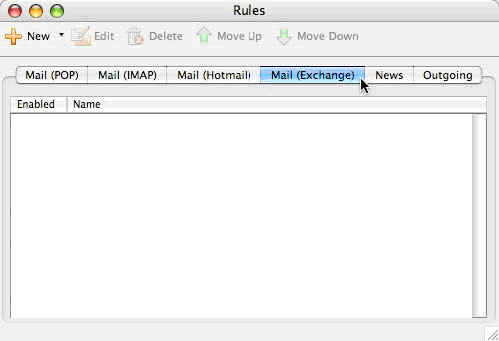
3. Select the “Mail (Exchange)” tab.
Click image to view larger
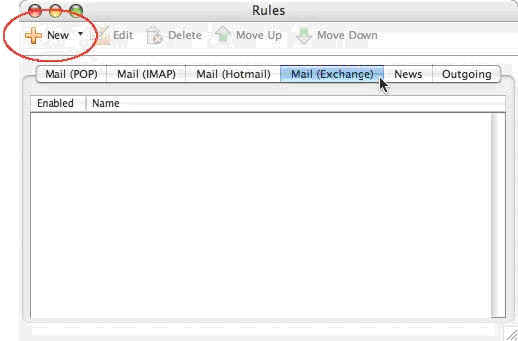
4. Click the “New” button.
Click image to view larger
5. Give the Rule a name.
Click image to view larger
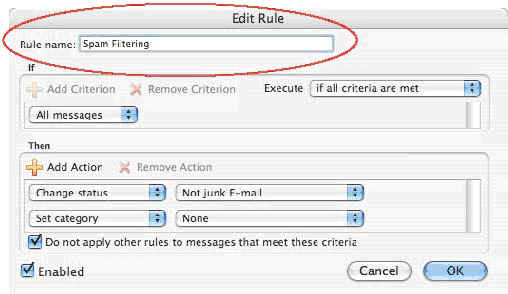
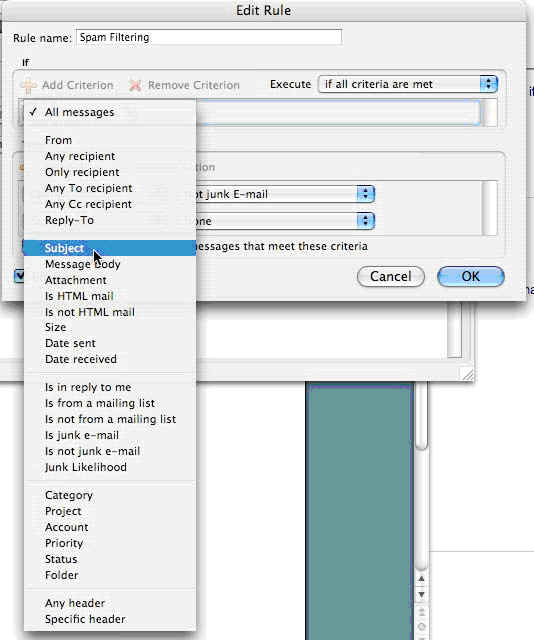
6. Under the “If” section, click the first drop-down menu and select “Subject.”
Click image to view larger
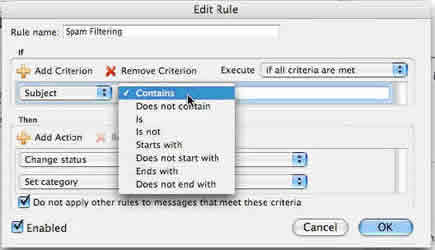
7. Make sure the second drop-down menu says “Contains.”
Click image to view larger
8. Type [Spam] in the text field.
9. Under the “Then” section, click the first drop-down menu and select “Move message.”
Click image to view larger
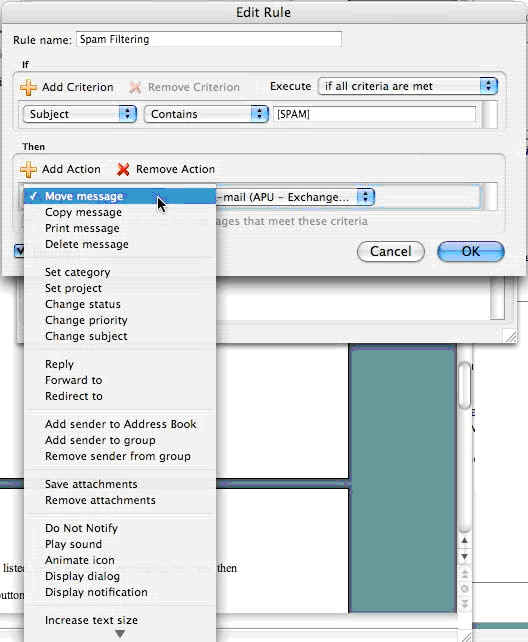
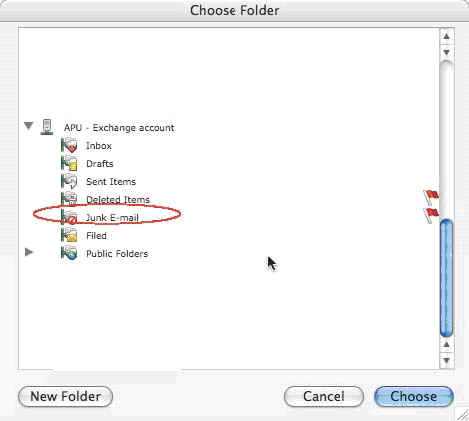
10. Under the “Then” section, click the second drop-down menu and select “Choose folder.”
Click image to view larger
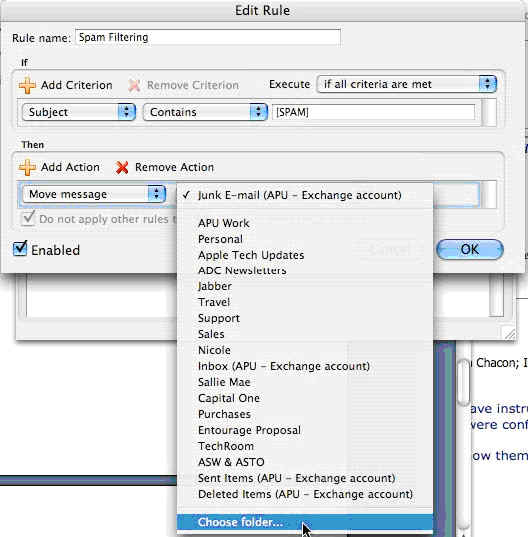
11. Under the “Then” section, click the second drop-down menu and select “Choose folder.”
Click image to view larger
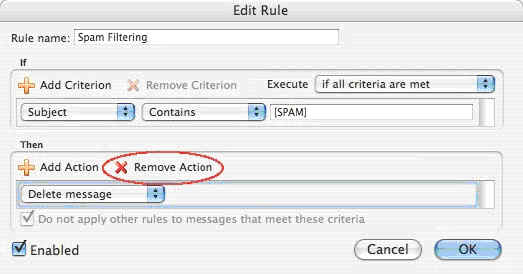
12. If there are any more actions listed, select the action by clicking on it and
then click the “Remove Action” button.
Click image to view larger
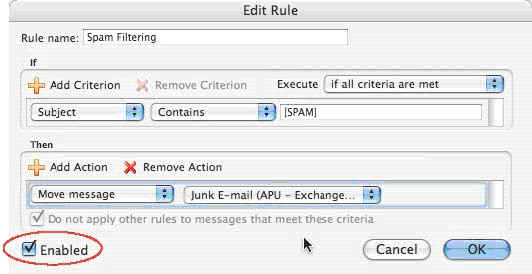
13. Make sure the “Enabled” box is checked.
Click image to view larger
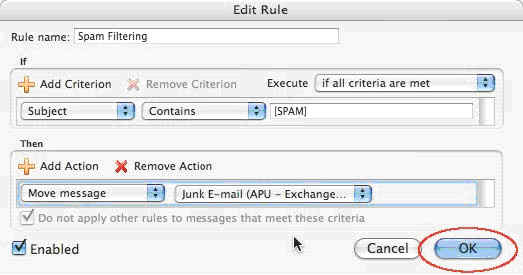
14. Click the “OK” button.
Click image to view larger
15. Close the “Rules” window.
Symantec Bright Mail Anti-Spam
In response to the university’s request to limit the number of unsolicited email messages (spam) arriving in APU inboxes, IT has implemented a centralized spam detection system called Symantec Brightmail Anti-Spam (Brightmail).
[Spam]
Brightmail works by scanning all incoming email messages before they reach APU inboxes and tagging the message subjects with “[Spam]” if they meet specific criteria defined by the Brightmail filters.
Example: [Spam] will be prepended to “Invest in this stock now!” to produce “[Spam]Invest in this stock now!” if the Brightmail filter determines that the message is spam.
IT recommends that you set up email filtering to move these messages to your Junk Mail folder if you are on the Exchange 2003 email system.
False-Positive
A false-positive results when Brightmail believes that a message is spam when it in fact is not spam. According to Symantec’s published statistics, this will occur 1 time for every 1,000,000 email messages received.
False-Negative
A false-negative results when Brightmail determines that a message is not spam when it in fact is spam. According to Symantec’s published statistics, this will occur 5 times for every 100 spam messages you receive. In other words, this filter will catch 95 percent of your spam.
[Suspected Spam]
IT has added a second filter that works by scanning all incoming email messages that are not marked as [Spam] before they reach APU inboxes and tagging the message subject with [Suspected Spam] if it meets specific criteria defined by IT. This filter is designed to try and catch the 5 percent of spam that the Brightmail filter does not catch.
Example: [Suspected Spam] will be prepended to “Let’s go to the beach tomorrow” to produce “[Suspected Spam]Let’s go to the beach tomorrow” if the custom IT filter suspects that the message may be spam.
IT recommends that you do not set up email filtering rules for these messages. There will be very few of these messages and therefore they will be easier to filter through if they are delivered to your inbox.
Reporting False-Positives and/or False-Negatives
Please do not contact IT regarding false-positives or false-negatives unless the issue persists for more than 24 hours. Symantec releases updated spam filters for Brightmail approximately every 10 minutes, so most likely the problem will be fixed quickly and automatically.
Filtering Tagged Messages
Those who are using Outlook and/or Outlook Web Access (https://mail.apu.edu) to access email at APU can create rules that look for messages with [Spam] in the subject line. Please visit Setting Up a Spam Rule section above to learn how to add rules to the email client that you are using.
Please contact the IT Support Center via phone at (626) 815-5050 or Ext. 5050, or via email at [email protected] if you have any questions, comments, or concerns.
Windows XP SP2 Guide
The following document provides information for using Windows XP Service Pack 2.
Windows Tips and Tricks
Please use the following links for helpful tips and information about the Windows operating system.
| Key Combination | Result |
|---|---|
| [Alt] and [Esc] | Switch between running applications |
| [Alt] and [Tab] | Toggle between running applications |
| [Alt] and letter | Select menu item by underlined letter |
| [Ctrl] and [Esc] | Open Program Menu |
| [Ctrl] and [F4] | Close active document or group windows (does not work with some applications) |
| [Alt] and [F4] | Quit active application or close current window |
| [Alt] and [-] | Open Control menu for active document |
| [Alt] and [Spacebar] | Open Control menu for active application |
| [Ctrl] Lft., Rt. arrow | Move cursor forward or back one word |
| [Ctrl] Up, Down arrow | Move cursor forward or back one paragraph |
| [Ctrl] and X | Cut selected text or object(s) |
| [Ctrl] and C | Copy selected text or object(s) |
| [Ctrl] and V | Paste copied text or object(s) |
| [F1] | Open Help for active application |
| Windows+E | Open Windows Explorer |
| Windows+F | Open Find |
| Windows+M | Minimize all open windows |
| Shift+Windows+M | Undo minimize all open windows |
| Windows+R | Open Run window |
| Windows+F1 | Open Windows Help |
| Windows+Tab | Cycle through the Taskbar buttons |
| Windows+Break | Open the System Properties dialog box |
Windows Keyboard Shortcuts
This is a list of the 26 Windows Keyboard Shortcuts associated with each letter of the alphabet.
| Shortcut | Function |
|---|---|
| Ctrl + A | Select All |
| Ctrl + B | Bold |
| Ctrl + C | Copy |
| Ctrl + D | Duplicate |
| Ctrl + E | Center Align Text |
| Ctrl + F | Find |
| Ctrl + G | Go to Page |
| Ctrl + H | Replace |
| Ctrl + I | Italic |
| Ctrl + J | Justify Text |
| Ctrl + K | Left Align Text |
| Ctrl + N | Enter Mark mode |
| Ctrl + M | Open New Doc |
| Ctrl + O | Open |
| Ctrl + P | |
| Ctrl + Q | Quit |
| Ctrl + R | Right Align Text |
| Ctrl + S | Save |
| Ctrl + T | Edit Next |
| Ctrl + U | Underline |
| Ctrl + V | Pate |
| Ctrl + W | Close document |
| Ctrl + X | Cut |
| Ctrl + Y | Redp |
| Ctrl + Z | Undo |
Extend a Selection Keyboard Shortcuts
| To extend a selection... | Press these keys |
|---|---|
| One character right | SHIFT+RIGHT ARROW |
| One character left | SHIFT+LEFT ARROW |
| To end of a word | CTRL+SHIFT+RIGHT ARROW |
| To beginning of a word | CTRL+SHIFT+LEFT ARROW |
| To end of a line | SHIFT+END |
| To beginning of a line | SHIFT+HOME |
| One line down | SHIFT+DOWM ARROW |
| One line up | SHIFT+UP ARROW |
| To the end of a paragraph | CTRL+SHIFT+DOWN ARROW |
| To the beginning of a paragraph | CTRL+SHIFT+UP ARROW |
| One screen down | SHIFT+PAGE DOWN |
| One screen up | SHIFT+PAGE UP |
| To the end of a window | ALT+CTRL+PAGE DOWN |
| To the beginning of a document | CTRL+SHIFT+HOME |
| To include the entire document | CTRL+A |
Windows Terms
| Term | Description |
|---|---|
| Objects | Objects are the basic components in Windows XP. The desktop is a display area for objects. Microsoft uses icons to represent objects. |
| Files | A file is a collection of data that is stored under a single name. |
| Data files | Data files are the documents you create and save, such as a MS Word document. |
| Program files | Program files execute a program, for example Microsoft Word. |
| Container | A container stores your files. Containers come in different forms; an example is a disk drive or a folder. |
| Shortcuts | Shortcuts on the desktop make it easier to access frequently used objects, such as a favorite program or file. |
| Tooltips | Tooltips are small pieces of text information that display randomly in Windows XP and it's application. Tooltips provide information about the icon when you place the mouse pointer over the object, button, or link. |
| Primary Mouse Button | Typically the left mouse button (for a right-handed mouse) used to select an object. |
| Secondary Mouse Button | The secondary mouse button is typically the right mouse button. The secondary mouse button produces a shortcut menu of options most likely to be used based on where the right click occurred. |
| Taskbar | The taskbar at the bottom of the desktop contains the Start button. The taskbar is a base of operations. |
| Start Menu | Click the Start button to display the Start Menu, a list of commands. |
For detailed technology information, IT offers the following Technology Handbook.